Hi there, I’m The Brad Lloyd. I am a YouTube creator with a channel all about making your life easier by building a Smart home focused on Apple HomeKit. This post is Back to Basics! I’ll share what you need to know to get started from scratch and even improve your existing Smart Home. I’ll give you an idea of what’s possible, and share some considerations to avoid making some of the mistakes I’ve made along the way. I’ll share products I recommend and some, in my opinion, to avoid.
When I started my smart home there were far fewer options available than there are today, and the costs of many of these Homekit products have gone down considerably, making it more affordable to use the HomeKit platform. I’m crossing my fingers that this continue to improve as matter is rolled out, hopefully later this year.
The goal of my Smart Home is to make it work, not just for me, but for everyone in the household. This requires a lot of thought, planning and adjusting as you go. My family is pretty knowledgeable about our Smart Home and they are frequently suggesting or just making tweaks themselves in the Home App. When you have friends and visitors over, it’s great to have a mix of automations, scenes and then provide the option for physical buttons and switches. Read on for how I have accomplished this balance in my home.
MATTER
So what is Matter? Currently, when choosing products for your smart home you need to look for the “Works with Apple HomeKit” logo. There are still many products that don’t work with HomeKit. From what I’ve been told, the HomeKit certification process can be challenging and costly so sometimes it’s easier for manufacturers to omit HomeKit support. This can make it difficult for consumers and Homekit enthusiasts to find products that will fit with their smart home and limits options. Matter is a new smart home standard that should help to simplify this process. The idea is for smart home manufacturers to adopt this new standard so soon you won’t have to look for the sticker that says “Works with Apple HomeKit” or “Alexa’ or “Google”, you’ll just need to know that it works with Matter.
It’s expected that the first matter certified products will be available later this year (2022) and that is really exciting for the smart home industry. In my opinion, HomeKit users may benefit the most from this new standard. We’ll likely need to be very patient and it is going to take time even once the first products roll out. I wouldn’t hold out for Matter at this point, it could still be years before we
WHY CHOOSE HOMEKIT?
There are many other options available and they all have Pros and Cons. I’ve only used Apple HomeKit because well, I’m an Apple guy… I trust Apple more than the competition – especially when it comes to Privacy. And I love how well Apple products integrate together. The more Apple products and services you use, the better the experience – and I find this to be the case with HomeKit as well. It’s not perfect, but it’s reliable and is constantly improving.

HOME HUBS
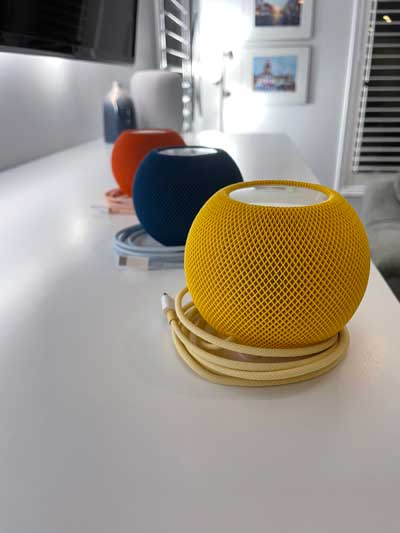
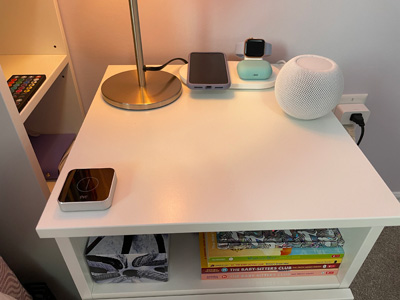
To get started with HomeKit you really just need your iPhone – though if you’re serious about building your smart home the first thing I recommend is making sure you also have a HomeHub. This could be an Apple TV that runs on TVOS, an iPad that doesn’t leave your home, or a HomePod, including the HomePod mini.
The HomeHub isn’t required, though extremely important in my opinion as it stores your scenes and automations and perhaps most importantly allows you to view and control your home remotely with end-to-end encryption. This way you can check to make sure you locked the door, or receive doorbell notifications when someone comes to the door, even when you’re not home.
I love the Apple TV and 100% of my TV content comes through my Apple TV, but if there was one product I would recommend to start your HomeKit home with it would be a HomePod mini.
Not only is the HomePod mini a Home Hub, but it’s a thread border router. Thread is a communication technology that certain devices use. It’s fast, reliable, has excellent range and will work with matter.
Thread is relatively new in the smart home. Most devices will communicate using Bluetooth, Wifi or through bridged technologies.
Bluetooth doesn’t require a hub and it’s energy efficient which is great for those battery operated devices. But it’s slow with limited range.
Wifi also doesn’t require a hub. It’s faster and has better range than bluetooth, but it uses a lot of power, and too many wifi devices can crowd your wifi networks, which could cause reliability issues.
Bridged Technologies, like Philips Hue & Aqara, have a lot of advantages such as being fast, and low powered, but they do use a hub which can be an additional cost and take up more room in your home.
Currently thread enabled devices are limited. Eve has been at the forefront of Thread and they have many thread compatible devices to choose from. Nanoleaf also has a good thread line up.
A thread border router can be either the 2021 Apple TV 4K, or the HomePod mini. Nanoleaf is said to be releasing an update to Elements, Panels and Lines that will allow them to work as a Thread Border router in HomeKit as well.
For $129 Canadian though, the HomePod mini also gives you a great sounding speaker and a voice assistant which can be helpful for playing music, sending messages, adding notes and reminders and yes – controlling your smart home.
GETTING STARTED – YOUR FIRST HOMEKIT PRODUCTS
When it’s time to add your first HomeKit accessories there is no “best first product” to start with – it just depends on your needs. Do some research – watch some YouTube videos, read blogs like this or some online reviews before making any decisions. It’s not something you need to rush into, so take your time. I started with some smart lights, then added some motion sensors, door and window sensors, then it just grew from there… I would look for items to go on sale and when people asked for birthday or Christmas gift ideas I would often suggest smart home accessories. My family even jumped on board and asked for Homekit gifts, I was so proud. So it’s good to start slow, but the more devices you have, the more you will be able to do – like arriving home and having your doors unlock, your lights turn on, your thermostat adjust to the perfect temperature and your music starts playing. So let’s dig a little deeper into the different areas of homekit products you can explore. I will leave some affiliate links if you are interested in adding any of these items to your collection. If you’d consider using my links, it could help the channel out with a small commission at no extra cost to you.


LIGHTING
LIGHTING! Ok, this is a big one…. Light bulbs, light switches, light strips and downlights… Lots to consider here!
The first question to consider… Do you want the ability to adjust the colour or light temperature? If the answer is no, and you are happy with standard bulbs then it’s typically more economical to install a smart light switch instead of a smart light bulb. It’s a little more work since you’re dealing with wiring, but trust me – it’s pretty easy and doesn’t take a lot of time.
SWITCHES
When it comes to smart switches I cannot recommend Lutron Caseta enough. Almost all of my lights are Caseta and I have never had an issue. They are truly the best of the best. They do require a hub so are part of the bridged technologies I mentioned earlier, and their switches are a little more expensive than others, but they are 100% worth it – especially if you are installing several switches. Lutron also sells pico remotes, sometimes bundled with their switches which are great for using with a 3 way switch or just adding additional lighting controls in convenient locations.
Other options that have worked well for me and that are less expensive include Meross and Aqara. Meross is the least expensive and uses wifi. Aqara on the other hand communicates using Zigbee so requires hub though we heard some exciting announcements at CES that they may add thread! I do not recommend Wemo wifi products – I have issues with no response errors and falling out of HomeKit so I just can’t recommend it currently. Some viewers have had better luck than I have, but just not something I’ve been a big fan of to this point. @Wemo – if you’re reading this, I’d be happy to test out the new Thread products from Wemo…Happy to reconsider my opinion if the products have improved.
SMART BULBS
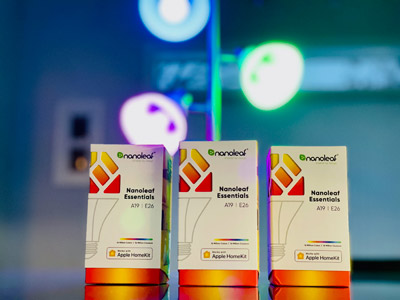
If you do want colour or the ability to change the lighting temperature then I’d suggest going with a Smart Bulb. The two lights I recommend are Philips Hue and Nanoleaf Essentials. Philips Hue really is top of the line in my opinion. The colours are excellent and they have been extremely reliable for me. Though they do require a HUB and have a higher price point. They also sell a white ambiance light as well if you only need the ability to change the lighting temperature, so can save money if colour isn’t important to you. They also sell an 1100 and 1600 bulb if you need something a little brighter, though be aware of the 1600lm bulb as it’s a little larger than the standard size, so you will need to make sure it fits in your light fixture.
Nanoleaf are less than half the price of Philips hue. They are bright and their colours are good, though not as great as Philips Hue. They use Thread so don’t require a Hub and are considered a full thread device so they actually help improve the reach and reliability of your other thread accessories.
Another solid option is Lifx. They have a reputation for being bright with excellent color. They don’t require a hub, though they use Wifi which can be less reliable.


LUTRON AURORA
One of my pet peeves is when someone turns off a light switch connected to smart lights. If the light switch is turned off your smart lights won’t work. Reminding your family not to turn the switch off may be doable, but expecting this of guests in your home isn’t as simple. So when I have smart lights that are on a switch I recommend using Philips Hue smart lights and adding a Lutron Aurora. This is a rotary dimmer switch designed specifically for Philips Hue lights that are capable of turning the lights on or off, or dimming the lights. This way your smart lights can be turned on using either the Aurora dimmer switch or within HomeKit. Unfortunately there isn’t an Aurora equivalent for other companies like Nanoleaf – at least not as of recording this video.
LIGHT STRIPS


Light strips are an amazing way to create ambient lighting in your home and there are so many possible places where you can install these lights. Common examples are behind TVs, under cabinets, along headboards and on shelves. Light strips provide diffused light that can transform the atmosphere of any space. Since you want diffused light, you want to avoid seeing the individual LEDs. To help with this you can sometimes use a diffuser like these ones I’m using under my kitchen island. I got these off of amazon and it certainly does help. You also want to make sure there is space between the LED strip and the wall to allow room for the diffused light to spread out.
There are many great options when choosing a light strip. It’s hard to give you my favourite because there are so many good ones. Again, Philips Hue and Nanoleaf are great and I also really like Eve. Unlike Philips Hue which requires a bridge and Nanoleaf which uses Thread, The Eve light strip uses Wifi, but it’s also bright and the colours are great.
If you’re looking for a really fun light strip though, I highly recommend the Onvis K1 Kameleon light strip. This is an addressable light strip so you can use multiple colours at the same time. It looks amazing and there are some really cool effects available. Like the Eve light strip, this one also uses wifi. It’s not as bright as some of the other light strips I’ve mentioned, but if you like the options to customize individual sections of the LED strip – then this can be a really fun option!
Meross also has a light strip and while I’ve never used it, I’ve heard great things about the product, especially for a very reasonable price. I have one of these on the way to me right now, so stay tuned for a video review once I’ve tested it out!
The only light strip that I don’t really recommend is Vocolinc. It’s not super bright, the colours, especially whites are terrible – and it just isn’t reliable. It might work if you just need light in a closet and some have told me that Vocolinc said it works fine for them, but it’s not one I’d personally recommend to you.


LAMPS
Aside from switches, light bulbs and led strips, there are also some lamps you can consider, including some from Meross like this ambient lamp that I’ve been using for several months and absolutely love! I’ll link my review on that one in the comments. It’s a great little light that I keep in my great room as an accent light but would also work well as a bedside or desk lamp.
PORTABLE ACCENT LIGHTING
And if you are looking for something wireless there are options as well including the Philips Hue GO and my favourite HomeKit accent light – Eve Flare!
DOWNLIGHT/POTLIGHTS
When it comes to pot lights your selection is limited unfortunately, though Philips Hue does sell a 4” and 6” version that’s available in white or colour. It works great, but requires a recessed can and E26 connection so may not be convenient for everyone. I have one of these in my house. I had to buy a recessed can and hire an electrician so it wasn’t cheap. Since it’s on a switch I also paired it with a Lutron Aurora which was another $40. Was it worth it? For me, Yes! It was just one light, but I’m not about to convert the rest of my pot lights to smart lights anytime soon!
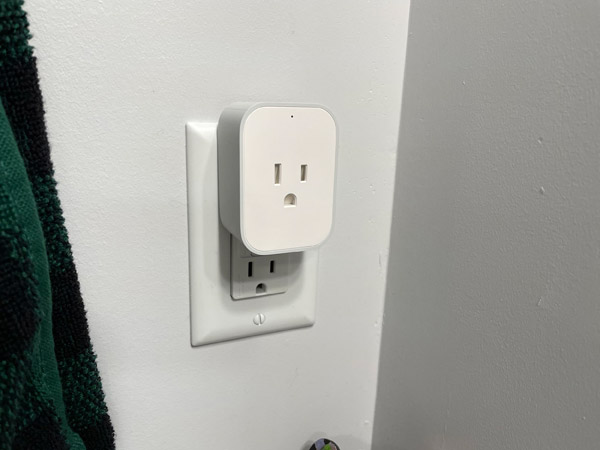


SMART PLUGS
Smart plugs are an easy and affordable way to make devices in your home smart. For the holidays I had several of my lights, including my Christmas tree on a smart plug. It was so nice to set my holiday scenes and all my devices that plug in turned on. This can also be helpful for lamps or space heaters. I even have a smart plug controlling my gas fireplace.
I have two go to smart plugs that I recommend to people. If you want the best I recommend Eve Energy. It’s $54 Canadian, but totally worth it – especially for those devices that you need to work every time. On top of being reliable, it has energy monitoring so you can view historical energy consumption and it communicates using Thread! Like the Nanoleaf lights, it’s a full thread device so it increases the reach and reliability of your other thread devices!
The other smart plug I recommend is the Meross smart plug which costs around $20. It uses wifi and it’s a decent choice that works well. I have several of these throughout my home.
Honourable mention goes to Aqara here. Aqara uses a hub and costs around $42 so sort of in the middle price-wise, but it’s also been reliable for me.
Smart plugs to avoid would be Wemo – they often fail to respond and fall out of HomeKit for some reason. Honestly not a fan, those WeMo just announced at CES a new smart plug that will be Thread compatible so I’m looking forward to giving WeMo another try once that comes out.

SMART LOCKS
Ok, let’s talk about locks. I absolutely love having a smart lock. No more worrying about if I forgot to lock the doors or not. I created an automation or use an NFC tag to lock my doors as I leave home. I use the Weiser Premis lock – I actually have two of them and honestly they work pretty well. Last year I did a video on some some of my top HomeKit products and ones to avoid and actually had my Weiser Premis locks on my avoid list. While they worked most of the time, they didn’t work all the time and in my opinion, locks are one device that need to work 100% of the time. I’m not sure if there was a firmware update or what, but it’s actually been working really well for me since that video. I can’t think of the last time they didn’t work (knock on wood!)
I’ve heard mixed reviews from other locks by Level and August. Some people seem to love them and others hate them. I’m really excited for Home keys. This was announced at one of Apple’s keynotes last year and basically uses NFC to unlock your doors by tapping your Apple watch or iphone to the lock. It’s an exciting technology that hopefully we’ll see soon. I’m also waiting for the first thread enabled door lock! Schlage has a new lock coming this spring called the Schlage Encode Plus that is said to be compatible with Home keys! It’s WiFi, not Thread, but still should be pretty cool. Aqara is also releasing a door lock with Home keys to the international market later this year, so really exciting to see. I hope to be able to eventually test these out for you.
Honestly, if you don’t need a lock right away then consider holding out for a lock with Home Keys. I don’t always recommend waiting for products though in this case, a Smart lock is often more of an investment and not a product you move around in the home. No one wants to get locked out or to stand at the door with heavy groceries waiting for their lock to respond, so reliability is key…

SMART THERMOSTAT
Another popular HomeKit category is thermostats! This is a common first HomeKit product to upgrade when the time comes to replace your thermostat. I highly recommend opting for one that’s smart home compatible. Smart thermostats are really convenient and can help save you money on your heating and cooling costs. There are a few brands to choose from including Honeywell and Emerson but my pick is Ecobee. It’s a great design, easy to use, it works well and has these room sensors you can place throughout your home to get the perfect temperature. I could do a full video on just the Ecobee – this is definitely my pick if you’re in the market for a smart thermostat. I often think how cool is it to live in a time when we can ask Siri to control the heating and cooling in our homes or really any of our Smart Home tech.
SMART SENSORS
When building your smart home, another category you’ll want to explore is sensors. These won’t likely be the first devices you choose, but once you’ve added some smart accessories like smart lights or smart switches for example, then using motion sensors or door and window sensors can take your smart home to the next level.
MOTION SENSORS
I use motion sensors in my basement stairwell to turn on my Philips Hue lights when motion is detected. I also use motion sensors in my laundry room and bathrooms to turn my lights on when we enter the room. What is great about HomeKit motion sensors is you can customise the brightness depending on the time of day, or even the lighting temperature if you are using smart lights. So you could have lights come on to a cool white during the day, and use a warm dimmed light in the evening.
My pick for motion sensors are the Philips Hue and the Aqara motion sensors. Both of these work great. When it comes to a motion sensor it needs to respond quickly in my opinion so I’m not a fan of bluetooth motion sensors. According to an article in the Verge, Eve is planning on releasing a revamped motion sensor later this year with Thread that will also include a light sensor. I can’t wait to get my hands on one of these once it’s finally released!
The Hue motion sensor is a little more expensive than Aqara but includes a temperature and light sensor as well, which can be really useful. I love being able to program lights to turn on at certain light levels instead of just the time of day! In either case, Aqara and Hue require a Hub but it’s totally worth it for the speed and reliability you get. Aqara has actually announced that they will be releasing a Thread motion sensor as well as a Door and Window sensor, since once it’s released these will no longer be reliant on a Hub to get it into HomeKit which will be really nice.
DOOR & WINDOW SENSORS
Door and window sensors are great for turning your lights on when you open a door. I have Door & Window sensors installed in my closets, my garage door, my kitchen pantry and basement windows. These are helpful for windows so you can easily check if you’ve remembered to close your windows and be alerted if there was a break-in.
My pick for Door and Window sensors is Eve Door & Window. It’s compatible with Thread so it’s super fast and reliable! Like many Eve products, it’s more expensive than the competition but worth it in my opinion. Aqara is another good option I can recommend.

BUTTONS – SMART ONES OFCOARSE!
Let’s press on with buttons. Automations are amazing. Now, of course you can go into the home app and adjust your accessories manually – or hollar at Siri. Those are both fine options, though buttons are even better in some situations. And since buttons are wireless you can basically put them anywhere you want. It’s so nice to be able to just press a button to immediately control an accessory or set a scene. Most buttons will also have 3 presses, a single, double and long press. Using Siri shortcuts you can create even more actions but I’m not going to get into that today, especially since three actions is typically enough.
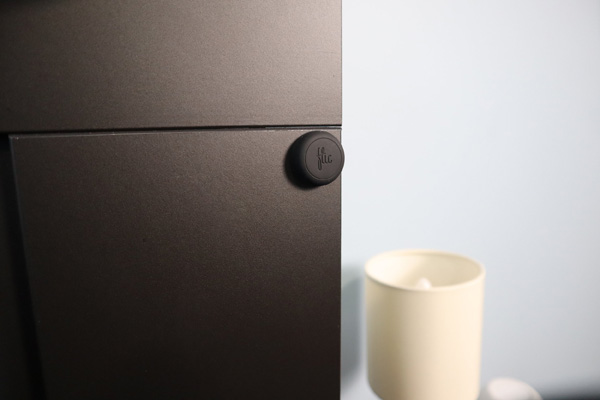
There are lots of options available including Eve Button and Fibaro, though my two favourite are the Aqara wireless mini switch and the Flic button. Both require a hub, but work really well so totally worth it in my opinion. Many of you may already have a manufacturer hub for the various companies but I mention this for those who are new to homekit. I especially like the small size of the Flic buttons and you can even add stickers to customise your buttons which I think is really cool. I have buttons all over the place to make it easy to set a scene including my kids beds so they can easily control different lights.


SMART VIDEO DOORBELLS
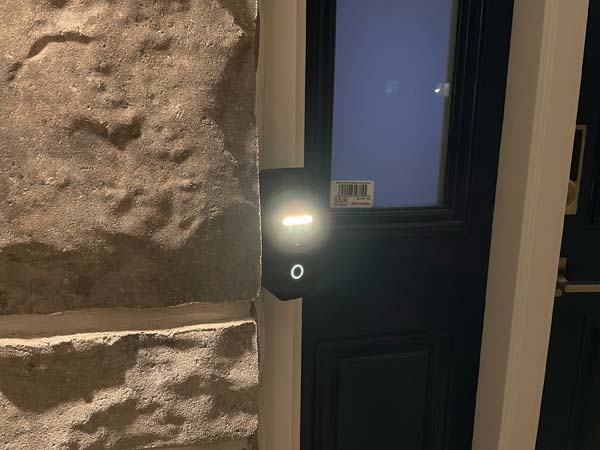
When it comes to HomeKit doorbells, the options available are still limited. There are some workarounds like the Starling hub to use Nest or integrating products into homekit using Homebridge or Hoobs. I always suggest go with products native to Homekit, when possible. I use the Logitech Circleview doorbell and it’s been amazing for me and it’s compatible with HomeKit secure video. There is no cloud plan to sign up for – just iCloud which you may already using. It’s great to be able to see who is at the door from my watch or phone, and I can monitor my front yard any time. I also love that the doorbell chime plays through my HomePod and since I have homepods all throughout my home, I know I’ll never miss the notification.
The one complaint some have about the Logitech circleview doorbell is that it doesn’t tolerate direct sunlight very well. I have a covered porch so it’s never been an issue for me, but if your door is in direct sunlight then it’s possible this isn’t the best option for you. Another consideration is that it’s only available in the US. I was fortunate to have a friend send this to me from the US, but I wish it was available here in Canada.
Another option that I haven’t used but heard good feedback on is the Netatmo doorbell. It’s compatible with HomeKit though doesn’t yet support homekit secure video, but apparently is in the works.
Lastly, WeMo just announced a new Doorbell that will work with HomeKit and supports HomeKit secure video. It’s available for pre-order in the US, and is supposed to ship in February or March. So this one could be another great option to consider.
SMART SHADES
Another category that is becoming more popular for HomeKit users are smart shades. I would say this isn’t most people’s first HomeKit product. Just think of the convenience of being able to open and close all your shades with one command, integrating this into your scenes automatically based on the time of day or even the temperature….. It sounds pretty nice to me, but they can be very expensive especially if you have a lot of windows. On the lower end, are some options from IKEA. The reviews have been mixed on these ones, and you will be limited in options so there are less customizations available. On the higher end are the Lutron Serena shades which offer more styles and material options. They are quiet and all calibrated so if you have multiple windows they raise and lower in sync which people really seem to love. But you definitely get what you pay for here – they are very expensive.
Luckily we now have an option right in the middle that I think are going to be very popular and these are the Eve MotionBlinds. These just recently came out. Eve partnered with Coulisse, a company that already makes blinds, to come up with MotionBlinds that are thread compatible and will be Matter ready soon. Currently, these are only available in a roller shade but apparently there are more options that will be available in the future. This was definitely an exciting announcement and I’m excited to test these out!
SMART CAMERAS – INDOOR & OUTDOOR
The last product category I want to cover is cameras. You can get indoor and outdoor cameras, sometimes wired and even wireless. Outdoor cameras can be great for monitoring your property and indoor cameras can be useful as a baby monitor or perhaps keeping an eye on your furry friends when you are away from home. There are many brands to choose from but there are some things to consider. I recommend going with an option that is compatible with HomeKit secure video, like the Logitech Circleview doorbell I mentioned earlier. This is so important for privacy. This is a cloud-based storage solution from Apple that’s free! Well sort of. It’s included as part of your iCloud plan, though storage doesn’t count against iCloud storage. Depending on your iCloud plan, you can have up to unlimited camera feeds which includes event based recordings when motion, people, packages or animals are detected. I like this option because your data is analyzed locally on your home hub and stored with end to end encryption. Since I already subscribe to iCloud I don’t have to pay anything additional.
Some companies will offer their own cloud storage options for a fee, and many cameras also have local SD storage, so make sure to do your research before you buy. I’m not currently using any outdoor cameras – just the Logitech Circleview doorbell. Though I’m using my Aqara G2H camera pointed outside so I can monitor my backyard. It works well during the day, though not so much at night. Despite having night vision, the glass is too reflective, significantly distorting the video image.
A top choice for outdoor cameras is Eufy. They have a wired and wireless option and supports HomeKit secure video. Not all Eufy cameras support Homekit and HomeKit secure video so just make sure you check that.
AQARA G2H AND G3 CAMERA
For indoor cameras – Aqara is a great choice! They offer the G2H and the new G3 which includes pan and tilt. It’s a great camera, and it’s also a hub so you can take advantage of other Aqara products for your smart home. Aqara is always packing extra value into their hubs.
EVE CAM
Eve is another great choice! Especially with Eve’s commitment to privacy. They also have a new outdoor floodlight camera that was just announced and is scheduled to be released in April.
I’m hoping to be able to add some outdoor cameras to my Smart Home soon so I can personally test these out and share my feedback.
OTHER
Those are the major product categories but there are others like air purifiers, air diffusers, Smart appliances, Smart vacuums to name a few. The list and product categories should expand quite a bit once Matter takes hold. I’m looking forward to when the list of products that will work with HomeKit explodes, and that is really exciting!
HOME APP
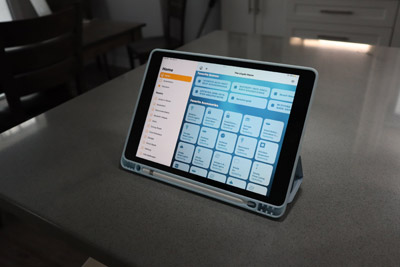
Let’s take a look at the basics of the Home app so you can better understand how to control and monitor your Smart Home. The Home App is usually pre-installed on your devices so just open that up. It is available for iPhone, iPad and Mac. You will need to do some basic set up like naming your home. Mine is named “The Lloyd’s home”. You can also create multiple homes if you have a cottage or second residence. The homepage of the Home App will show your status overview along the top. This is where you can see lights that are on, doors that are unlocked, and monitor the status and stats of your sensors. Moving down, you can see your favourite scenes and choose which ones show up here. Next, we have favourite accessories listed so you can easily access and control your most used devices. At the bottom are your favourite cameras so you can access your live feeds. On the second tab, we have rooms and I suggest you do put a little bit of effort to organize your Smart Home as you build it and I’ll show you how to add an accessory in a minute. When you have a lot of Homekit accessories, it’s so much easier to find what you’re looking for by going into the room. On the next tab, you can see all of your current automations. The last tab is discovery where you can learn more such as Getting started, home hubs and lighting, security, comfort and entry. Take some time to explore this if you’re just getting started.
On the top right of the screen, I also want to point out that you can easily access the Intercom feature. Press that to send an intercom to everyone in your household if you have a Homepod or Homepod mini. You can also access this feature under the Rooms tab if you want to send one to a specific room only. You can also control the Intercom feature with Siri.
If we go back to the first tab and click on the house in the Top left, this is another way you can see all of your rooms and if you scroll to the bottom, you’ll see Home settings where you can see the members of your home and invite new members. You can give people access to add and edit accessories and select if they have access to camera recordings, either to stream only or stream and view recordings.
There is a spot where you can see more information like camera and doorbell, doors and you can also see your home hubs and bridges that are connected to homekit including your Homepods or Apple TVs. You can see which home hub is your primary and which are in standby. Apple selects this for you based on your home set up and it will change as needed, however you cannot manually select this.
If you hit the Plus sign to the right, this is where you can add an accessory, scene, automation, room, people or even a new home. Let’s take a quick look at adding an accessory.
ADDING ACCESSORY IN HOME APP
If you see an NFC symbol on the homekit sticker of your device, then you can tap your phone to the sticker to quickly add it to Homekit.
Most of the time you will see a Homekit QR code. To add this to Homekit, simply click the plus sign to add an accessory and scan the code. You’ll then be prompted with options depending on what you’re adding and you’ll need to select the room to add this to. Ok, you’re all set to enjoy your new accessory.
SCENES
Once you add your first smart home accessories, you can start to create your own scenes and automations. A scene is simply controlling multiple accessories with one command. One of my most used scenes is my good night scene which locks my doors and turns off my basement and main floor lights, then turns on dim lighting upstairs as we get ready for bed.
Depending on the accessories you have you can create many scenes including a Dinner Scene or a Movie scene.
Let’s get started and create a quick one that dims my lights, turns on my fireplace and plays some relaxing music.
Hit the plus sign and click ‘Add scene’. Let’s call this scene “Cozy” This is the name that you will ask Siri to set when you want it to run. When you click add accessories, you will see everything listed room by room. I am going to scroll down to my great room and select the devices that I want to include in the scene. I am going to include my fireplace, my Homepod mini and a few of my lights. Once you have selected what you want, click done. Then tap each accessory to choose the action you want performed. For more options, press and hold the accessory and you can adjust the brightness and colour temperature, assuming you are using smart lights compatible with this feature.
To add music, Below your accessories, you will see an option for media. Select audio and click whether you want to play, pause, resume or adjust volume only. In this case I want to play music then I can click choose audio and select the music or playlist that I want.
Now choose whether you want to use the current volume or set a custom volume. Hit the left arrow to go back to the previous screen. You can include this as a favourite scene, so it shows up on the main screen. Otherwise, it will only be visible and accessible from the rooms that are part of this scene.
Click done, you’ve just created a scene in Homekit.
AUTOMATIONS
This is where smart accessories really get smart. You can create an automation based on so many things:
Location – When someone leaves or arrives home
Time of Day – Everyday at 9pm, lock the doors
Sunset/Sunrise – Turn on outdoor lights from sunset to sunrise or gradually turns on indoor lights as sunset approaches.
Accessory – When you turn on the bedroom main lights, the bedside lamp or closet lights also turn on.
Sensors – When a sensor detects something like motion, turn on a light or turn the heater on when the temperature reaches a certain point.
Conditions – A condition allows you to say “When something happens, do this, unless……..” The simplest example I like to use is “When motion is detected, turn the lights to 100%, unless the lights are already on”. This way if you’ve adjusted your light to your desired level they won’t keep turning to 100% each time motion is detected.
All of these automations can be setup in the Home app, but you can use some 3rd party apps to create some advanced automations using conditions – which can be super useful. Examples of 3rd party Home apps include Controller for HomeKit, Home+5 and the Eve app. I use all three, and they work great, though the Eve app is free, even if you don’t use any Eve accessories so it’s a great place to start for someone new to Homekit.
CREATE AUTOMATION
Let’s set up a simple automation to turn on my outdoor lights from sunset to sunrise.
Click the plus sign and select Add Automation. Here we will select ‘A time of day occurs’ and I will leave it at Sunset but if you click the i to the right, then I can adjust as needed. For example, 1 hour before sunset. Select the days of the week, I’ll choose all 7 days and you can add this automation based on when someone arrives home but I will leave this off. Click next, now scroll down to your accessory, I’ll find Outdoor and select Porch lights. Make sure to choose Turn on. At the bottom there is an option to turn off the accessory after a certain timeframe from 1 min to 4 hours. Since I want my lights to turn off at sunrise .I will keep this to never and click done. I will create a separate automation to turn my lights off at sunrise in the same way that I just did. Essentially, I’ll need 2 automations for this.
Now you’ve created an automation in Homekit.
CONCLUSION
No two smart homes need to be created equally. We all have individual needs and that is why the flexibility of a Smart Home is so great. Find what works best for you and your family.
As I said at the beginning, do your research, consider watching and supporting a range of other creators who work really hard to put out good content on YouTube, Blogs, Insta, Twitter and check out the perspectives of others. We all have different needs and preferences so the more info you have the better. You can also go to my YouTube Channel and then select the Channels tab where I list other creators that I recommend.
I hope you found this Smart Homekit Guide comprehensive and a good solid Intro to Homekit. I wish you all the best in starting your HomeKit Smart Home. I think the future is bright and who knows what exciting Smart home tech is right around the corner.
Thank you so much for reading and I will talk to you soon.